> ## Documentation Index
> Fetch the complete documentation index at: https://documentation.idenfy.com/llms.txt
> Use this file to discover all available pages before exploring further.
# iOS SDK Face Authentication
> Implement biometric face authentication in your iOS app using the iDenfy SDK for fast 30-second returning user re-verification sessions.
Face Matching authentication works from iOS SDK version 8.0.0.
## Introduction
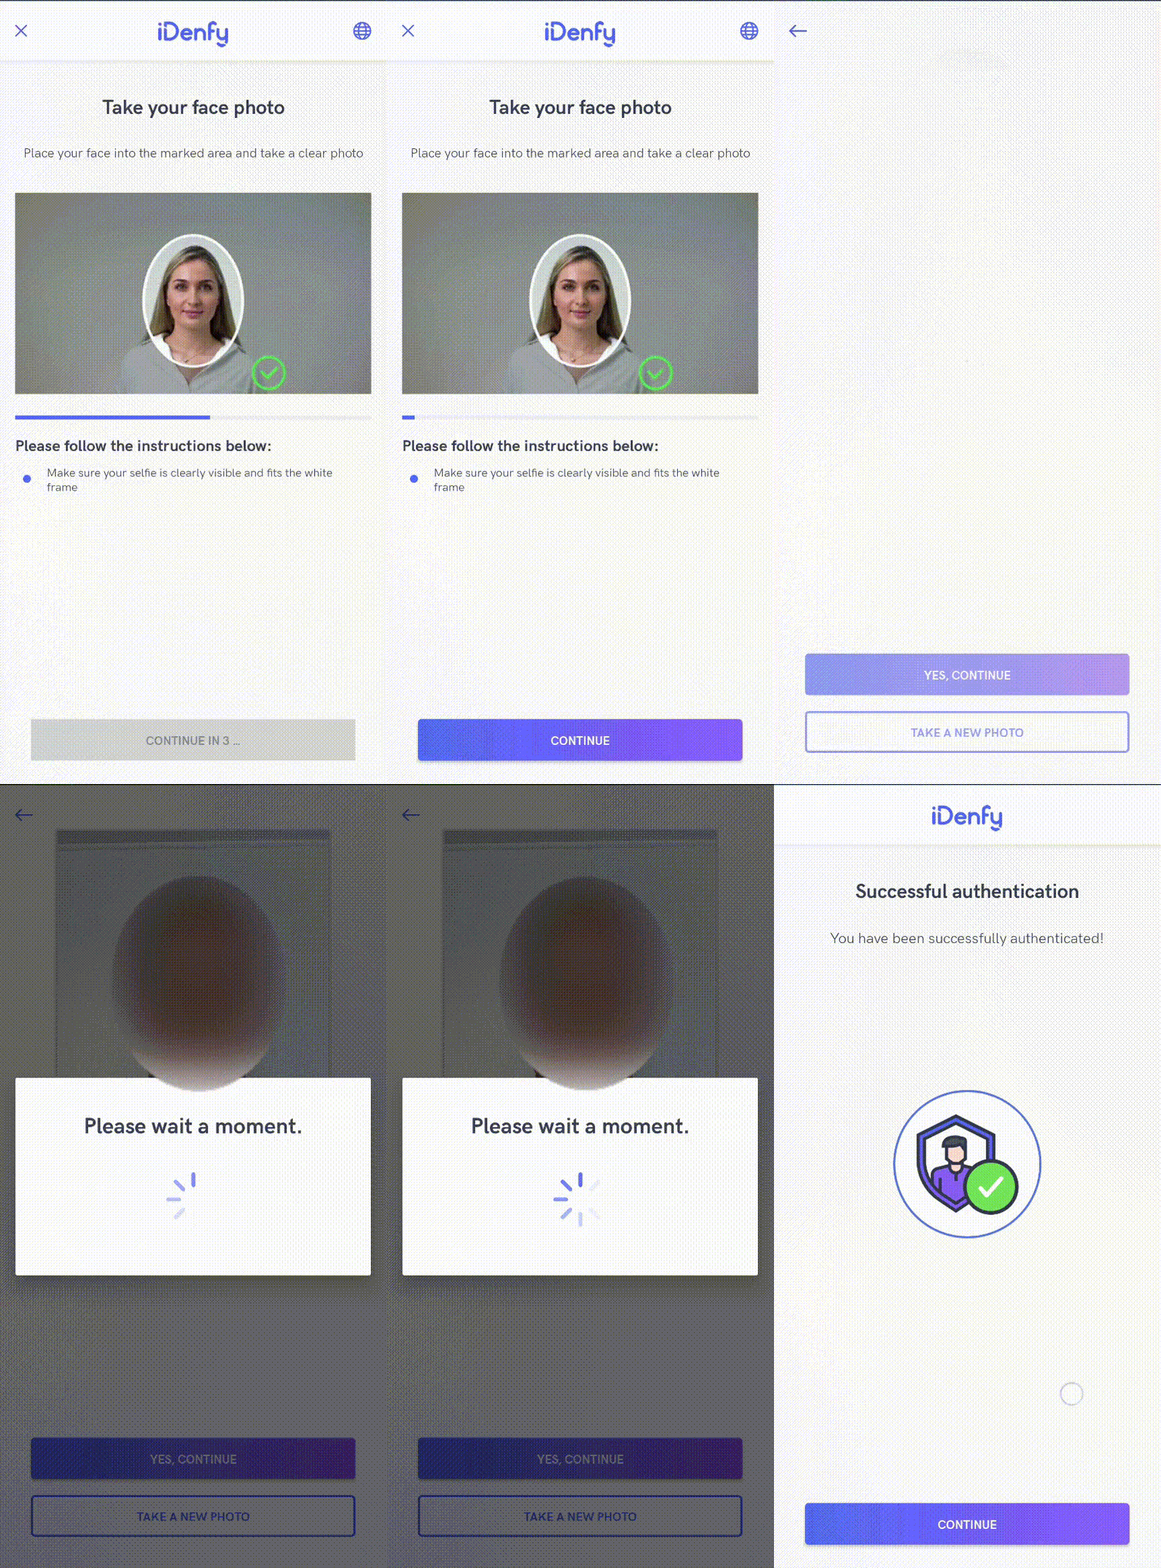
Face authentication is a tool to perform KYC checks once and then use the same scanRef to perform multiple verifications in just **30 seconds**.
The flow only requires your user to take a regular face photo to perform the authentication.
 ## Pre-Conditions
A [successful verification](/kyc/generate-token#graphical-representation-of-token-generation-uml-activity) must be performed before initializing face authentication. For face authentication all you need is a scanRef, which is obtained during [session creation](/kyc/generate-token#receiving-response).
## Getting Started
Follow the [iDenfy SDK integration guide](/sdks/ios/quickstart), which is required for face authentication as well.
After completing the steps and the application **compiles successfully**, you are ready to implement **face-auth specific** logic.
You can also download **the sample app**, which supports face authentication. [Download here](https://github.com/idenfy/iDenfyResources/blob/main/sdk/ios/tutorials/sample/idenfy_sample_ios.zip).
### Handle Webhook Callback
You will receive a webhook callback if it is your preferred way of handling results (recommended as it is more secure and reliable). The webhook structure is:
```json theme={"system"}
{
"token": "token",
"clientId": "clientId",
"scanRef": "scanRef",
"status": "SUCCESS",
"type": "AUTHENTICATION",
"method": "FACE_MATCHING",
"facePhoto": "https://s3.eu-west-1.amazonaws.com/production.users.storage/users_storage/users//FRONT.png?AWSAccessKeyId=&Signature=&Expires="
}
```
The `facePhoto` key is a String (URL), can be null, with a max length of 500. It provides a URL to download the selfie photo used for authentication.
The `status` key has the following values:
| Name | Description |
| ---------- | ---------------------------------------------------------------------------------------------------------------------------------------------------------------------- |
| `SUCCESS` | The user completed face authentication flow and the authentication status, provided by an automated platform, is SUCCESS. |
| `FAILED` | The user completed face authentication flow and the authentication status, provided by an automated platform, is FAILED. |
| `CANCELED` | The user did not complete the face authentication flow and canceled it and the identification status, provided by an automated platform, is EXIT. |
| `EXPIRED` | The user did not complete the face authentication flow, but did not cancel it explicitly and the identification status, provided by an automated platform, is EXPIRED. |
To set your webhook URL, contact tech support via the [dashboard](https://admin.idenfy.com/auth/login).
### Handle Callback in SDK
If you also want to handle results directly in the mobile app, implement the result handling in the SDK:
```swift theme={"system"}
idenfyController.handleIdenfyCallbacksForFaceAuthentication(faceAuthenticationResult: { faceAuthenticationResult in
print("FaceAuthenticationStatus: ", faceAuthenticationResult.faceAuthenticationStatus.rawValue)
switch faceAuthenticationResult.faceAuthenticationStatus {
case .SUCCESS:
// The user completed authentication flow, was successfully authenticated
break
case .FAILED:
// The user completed authentication flow, was not successfully authenticated
break
case .EXIT:
// The user did not complete authentication flow
break
@unknown default:
break
}
})
```
### Check Face Authentication Status and Create the Session
Before initializing the SDK, check whether your user can use face authentication and obtain an authToken. See the [Create Face Auth Session](/face-authentication/token-generation) documentation.
### Initialize SDK
Pass the session token to start face authentication:
```Swift theme={"system"}
let faceAuthenticationInitialization = FaceAuthenticationInitialization(authenticationToken: authenticationToken, withImmediateRedirect: false)
idenfyController.initializeFaceAuthentication(faceAuthenticationInitialization: faceAuthenticationInitialization)
let idenfyVC = idenfyController.instantiateNavigationController()
present(idenfyVC, animated: true, completion: nil)
```
## Customization
### Immediate Redirect
You can pass an additional boolean to set the immediate redirect feature. This controls whether you **receive results immediately** from the SDK without any additional result pages.
The user completes the verification, a loading state appears and closes -- without showing the final status screen.
```Swift theme={"system"}
let faceAuthenticationInitialization = FaceAuthenticationInitialization(authenticationToken: authenticationToken, withImmediateRedirect: true)
```
### Face Detection
While using face matching authentication, you can enable face detection, which requires users to place their face into the marked area before taking a photo. For better success rate, faces that are far away from the camera will not pass.
## Pre-Conditions
A [successful verification](/kyc/generate-token#graphical-representation-of-token-generation-uml-activity) must be performed before initializing face authentication. For face authentication all you need is a scanRef, which is obtained during [session creation](/kyc/generate-token#receiving-response).
## Getting Started
Follow the [iDenfy SDK integration guide](/sdks/ios/quickstart), which is required for face authentication as well.
After completing the steps and the application **compiles successfully**, you are ready to implement **face-auth specific** logic.
You can also download **the sample app**, which supports face authentication. [Download here](https://github.com/idenfy/iDenfyResources/blob/main/sdk/ios/tutorials/sample/idenfy_sample_ios.zip).
### Handle Webhook Callback
You will receive a webhook callback if it is your preferred way of handling results (recommended as it is more secure and reliable). The webhook structure is:
```json theme={"system"}
{
"token": "token",
"clientId": "clientId",
"scanRef": "scanRef",
"status": "SUCCESS",
"type": "AUTHENTICATION",
"method": "FACE_MATCHING",
"facePhoto": "https://s3.eu-west-1.amazonaws.com/production.users.storage/users_storage/users//FRONT.png?AWSAccessKeyId=&Signature=&Expires="
}
```
The `facePhoto` key is a String (URL), can be null, with a max length of 500. It provides a URL to download the selfie photo used for authentication.
The `status` key has the following values:
| Name | Description |
| ---------- | ---------------------------------------------------------------------------------------------------------------------------------------------------------------------- |
| `SUCCESS` | The user completed face authentication flow and the authentication status, provided by an automated platform, is SUCCESS. |
| `FAILED` | The user completed face authentication flow and the authentication status, provided by an automated platform, is FAILED. |
| `CANCELED` | The user did not complete the face authentication flow and canceled it and the identification status, provided by an automated platform, is EXIT. |
| `EXPIRED` | The user did not complete the face authentication flow, but did not cancel it explicitly and the identification status, provided by an automated platform, is EXPIRED. |
To set your webhook URL, contact tech support via the [dashboard](https://admin.idenfy.com/auth/login).
### Handle Callback in SDK
If you also want to handle results directly in the mobile app, implement the result handling in the SDK:
```swift theme={"system"}
idenfyController.handleIdenfyCallbacksForFaceAuthentication(faceAuthenticationResult: { faceAuthenticationResult in
print("FaceAuthenticationStatus: ", faceAuthenticationResult.faceAuthenticationStatus.rawValue)
switch faceAuthenticationResult.faceAuthenticationStatus {
case .SUCCESS:
// The user completed authentication flow, was successfully authenticated
break
case .FAILED:
// The user completed authentication flow, was not successfully authenticated
break
case .EXIT:
// The user did not complete authentication flow
break
@unknown default:
break
}
})
```
### Check Face Authentication Status and Create the Session
Before initializing the SDK, check whether your user can use face authentication and obtain an authToken. See the [Create Face Auth Session](/face-authentication/token-generation) documentation.
### Initialize SDK
Pass the session token to start face authentication:
```Swift theme={"system"}
let faceAuthenticationInitialization = FaceAuthenticationInitialization(authenticationToken: authenticationToken, withImmediateRedirect: false)
idenfyController.initializeFaceAuthentication(faceAuthenticationInitialization: faceAuthenticationInitialization)
let idenfyVC = idenfyController.instantiateNavigationController()
present(idenfyVC, animated: true, completion: nil)
```
## Customization
### Immediate Redirect
You can pass an additional boolean to set the immediate redirect feature. This controls whether you **receive results immediately** from the SDK without any additional result pages.
The user completes the verification, a loading state appears and closes -- without showing the final status screen.
```Swift theme={"system"}
let faceAuthenticationInitialization = FaceAuthenticationInitialization(authenticationToken: authenticationToken, withImmediateRedirect: true)
```
### Face Detection
While using face matching authentication, you can enable face detection, which requires users to place their face into the marked area before taking a photo. For better success rate, faces that are far away from the camera will not pass.
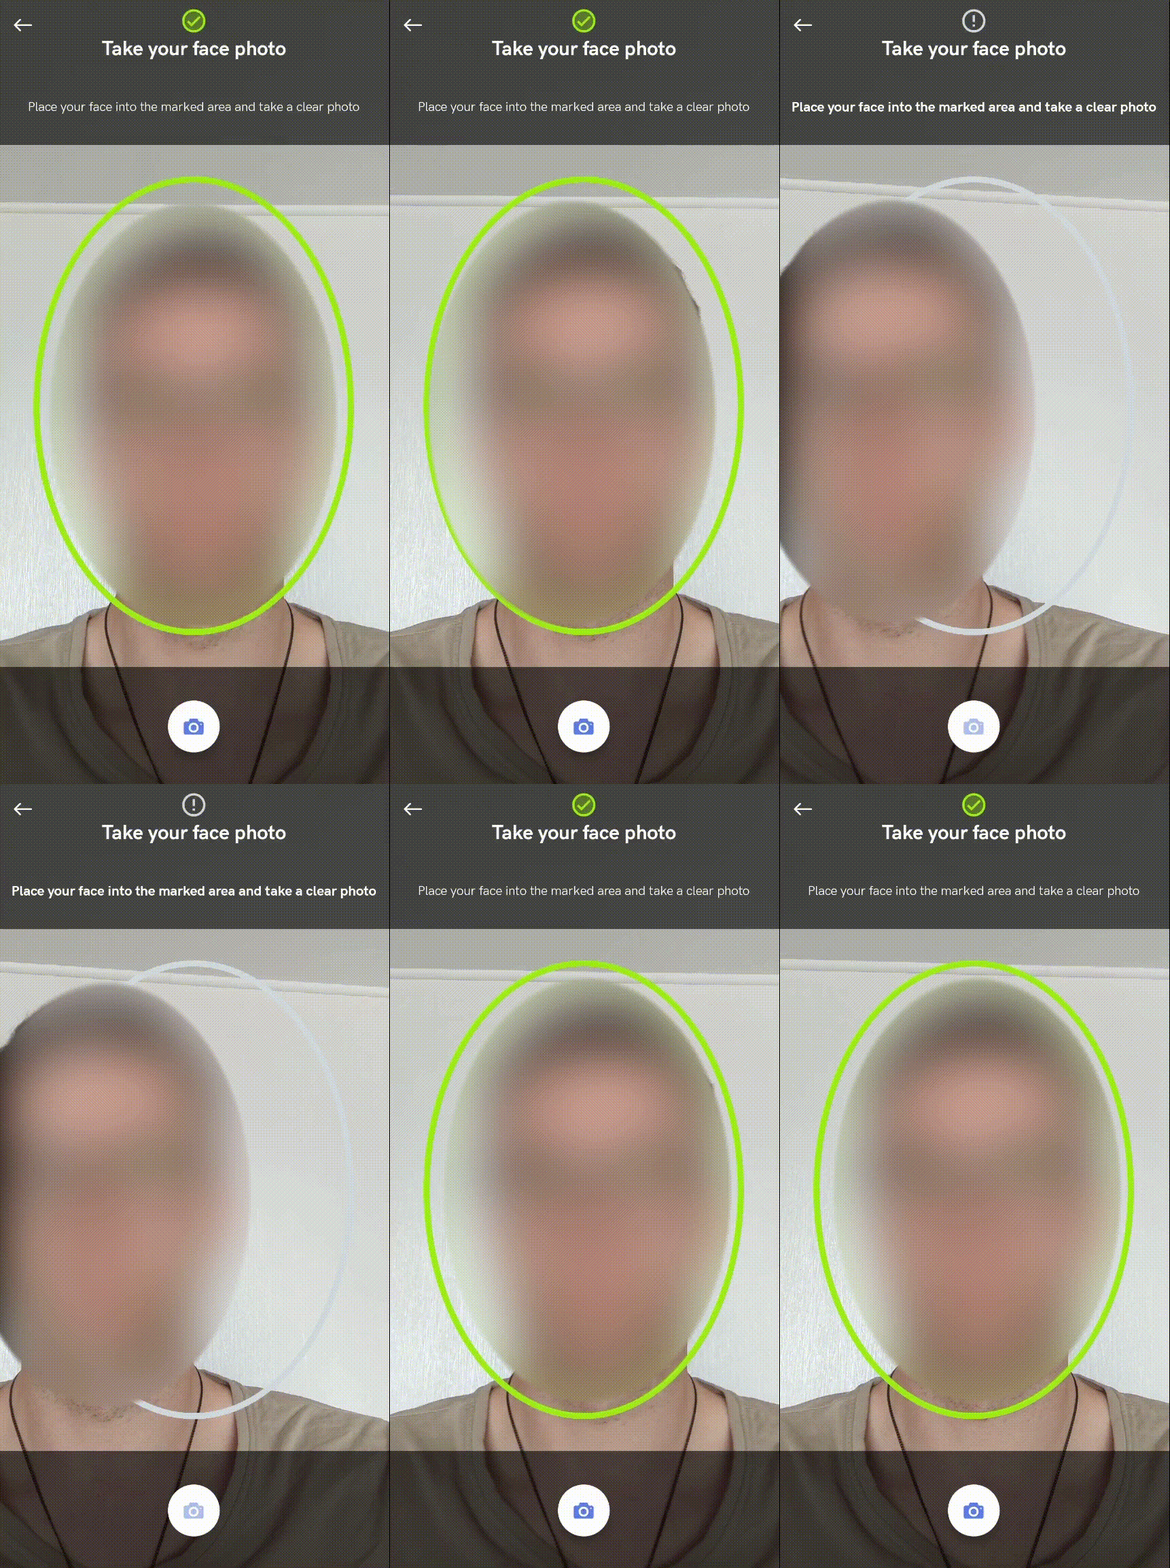 Contact tech support via the [Jira customer portal](https://idenfy-ivs.atlassian.net/servicedesk/customer/portal/1) to enable this feature. Face detection will apply to **both** KYC verification and face authentication flows.
### Passive Liveness Detection
While using face matching authentication, you can enable passive liveness detection to detect whether a selfie photo is genuine or not.
Contact tech support via the [Jira customer portal](https://idenfy-ivs.atlassian.net/servicedesk/customer/portal/1) to enable this feature. This will apply to **both** KYC verification and face authentication flows.
### Auto Capture
You can enable auto capture, which requires users to place their face into the marked area. The picture is then automatically taken and immediately processed:
Contact tech support via the [Jira customer portal](https://idenfy-ivs.atlassian.net/servicedesk/customer/portal/1) to enable this feature. Face detection will apply to **both** KYC verification and face authentication flows.
### Passive Liveness Detection
While using face matching authentication, you can enable passive liveness detection to detect whether a selfie photo is genuine or not.
Contact tech support via the [Jira customer portal](https://idenfy-ivs.atlassian.net/servicedesk/customer/portal/1) to enable this feature. This will apply to **both** KYC verification and face authentication flows.
### Auto Capture
You can enable auto capture, which requires users to place their face into the marked area. The picture is then automatically taken and immediately processed:
 Contact tech support via the [Jira customer portal](https://idenfy-ivs.atlassian.net/servicedesk/customer/portal/1) to enable this feature for face authentication.
## UI Customization
The UI can be customized the same as the [KYC verification flow](/sdks/ios/ui-customization#customization-by-changing-views-from-idenfyviews-module). Common colors or ViewUISettings can be overridden:
```Swift theme={"system"}
IdenfyCommonColors.idenfyMainColorV2 = UIColor.green
IdenfyCommonColors.idenfyMainDarkerColorV2 = UIColor.green
IdenfyCommonColors.idenfySecondColorV2 = UIColor.blue
IdenfyFaceAuthenticationInitialViewUISettingsV2.idenfyFaceAuthenticationInitialViewBackgroundColor = UIColor.white
IdenfyFaceAuthenticationResultsViewUISettingsV2.idenfyFaceAuthenticationResultsViewContinueButtonTextColor = UIColor.black
```
Custom implementations of iDenfy viewables can also be passed to the **IdenfyController**:
```Swift theme={"system"}
let idenfyViewsV2: IdenfyViewsV2 = IdenfyViewsBuilderV2()
.withStaticCameraOnBoardingView(StaticCameraOnBoardingViewV2())
.withFaceAuthenticationSplashScreenV2View(FaceAuthenticationSplashScreenV2View())
.withFaceAuthenticationResultsViewV2(FaceAuthenticationResultsViewV2())
.withFaceCameraView(FaceCameraViewV2())
.withCameraWithoutRectangleResultViewV2(CameraResultViewV2(frame: .zero, withRectangle: IdenfyCameraViewType.withoutRectangle))
.build()
idenfyController.initializeFaceAuthentication(faceAuthenticationInitialization: faceAuthenticationInitialization, idenfyViewsV2: idenfyViewsV2)
let idenfyVC = idenfyController.instantiateNavigationController()
present(idenfyVC, animated: true, completion: nil)
```
Face authentication flow has additional UI settings that can be passed using **IdenfyFaceAuthUIBuilder** along with **FaceAuthenticationInitialization**:
```Swift theme={"system"}
let idenfyFaceAuthUISettings = IdenfyFaceAuthUIBuilder()
//Show or hide language selection button
.withLanguageSelection(true)
//Show or skip camera on boarding screen
.withOnBoardingView(true)
.build()
let faceAuthenticationInitialization = FaceAuthenticationInitialization(authenticationToken: authenticationToken, idenfyFaceAuthUISettings: idenfyFaceAuthUISettings)
```
## Related topics
- [Android SDK Face Authentication](/sdks/android/face-authentication.md)
- [iOS SDK Additional Features](/sdks/ios/additional-features.md)
- [iOS SDK Migration Guide](/sdks/ios/migration-guide.md)
- [Face Authentication](/face-authentication/overview.md)
- [Face Authentication in the Dashboard](/guides/dashboard/face-auth/face-authentication.md)
Contact tech support via the [Jira customer portal](https://idenfy-ivs.atlassian.net/servicedesk/customer/portal/1) to enable this feature for face authentication.
## UI Customization
The UI can be customized the same as the [KYC verification flow](/sdks/ios/ui-customization#customization-by-changing-views-from-idenfyviews-module). Common colors or ViewUISettings can be overridden:
```Swift theme={"system"}
IdenfyCommonColors.idenfyMainColorV2 = UIColor.green
IdenfyCommonColors.idenfyMainDarkerColorV2 = UIColor.green
IdenfyCommonColors.idenfySecondColorV2 = UIColor.blue
IdenfyFaceAuthenticationInitialViewUISettingsV2.idenfyFaceAuthenticationInitialViewBackgroundColor = UIColor.white
IdenfyFaceAuthenticationResultsViewUISettingsV2.idenfyFaceAuthenticationResultsViewContinueButtonTextColor = UIColor.black
```
Custom implementations of iDenfy viewables can also be passed to the **IdenfyController**:
```Swift theme={"system"}
let idenfyViewsV2: IdenfyViewsV2 = IdenfyViewsBuilderV2()
.withStaticCameraOnBoardingView(StaticCameraOnBoardingViewV2())
.withFaceAuthenticationSplashScreenV2View(FaceAuthenticationSplashScreenV2View())
.withFaceAuthenticationResultsViewV2(FaceAuthenticationResultsViewV2())
.withFaceCameraView(FaceCameraViewV2())
.withCameraWithoutRectangleResultViewV2(CameraResultViewV2(frame: .zero, withRectangle: IdenfyCameraViewType.withoutRectangle))
.build()
idenfyController.initializeFaceAuthentication(faceAuthenticationInitialization: faceAuthenticationInitialization, idenfyViewsV2: idenfyViewsV2)
let idenfyVC = idenfyController.instantiateNavigationController()
present(idenfyVC, animated: true, completion: nil)
```
Face authentication flow has additional UI settings that can be passed using **IdenfyFaceAuthUIBuilder** along with **FaceAuthenticationInitialization**:
```Swift theme={"system"}
let idenfyFaceAuthUISettings = IdenfyFaceAuthUIBuilder()
//Show or hide language selection button
.withLanguageSelection(true)
//Show or skip camera on boarding screen
.withOnBoardingView(true)
.build()
let faceAuthenticationInitialization = FaceAuthenticationInitialization(authenticationToken: authenticationToken, idenfyFaceAuthUISettings: idenfyFaceAuthUISettings)
```
## Related topics
- [Android SDK Face Authentication](/sdks/android/face-authentication.md)
- [iOS SDK Additional Features](/sdks/ios/additional-features.md)
- [iOS SDK Migration Guide](/sdks/ios/migration-guide.md)
- [Face Authentication](/face-authentication/overview.md)
- [Face Authentication in the Dashboard](/guides/dashboard/face-auth/face-authentication.md)